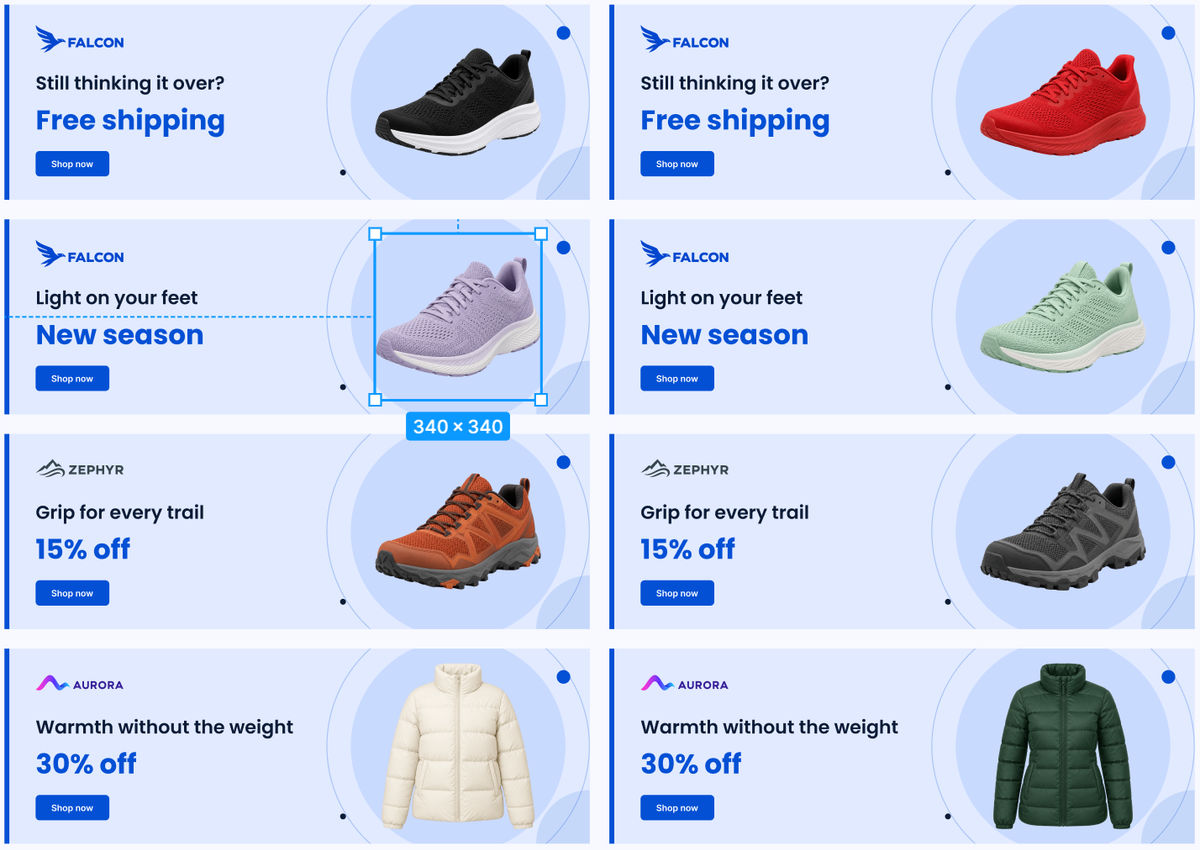
The 30 banners below were generated from a single Figma frame, without anyone laying them out by hand.
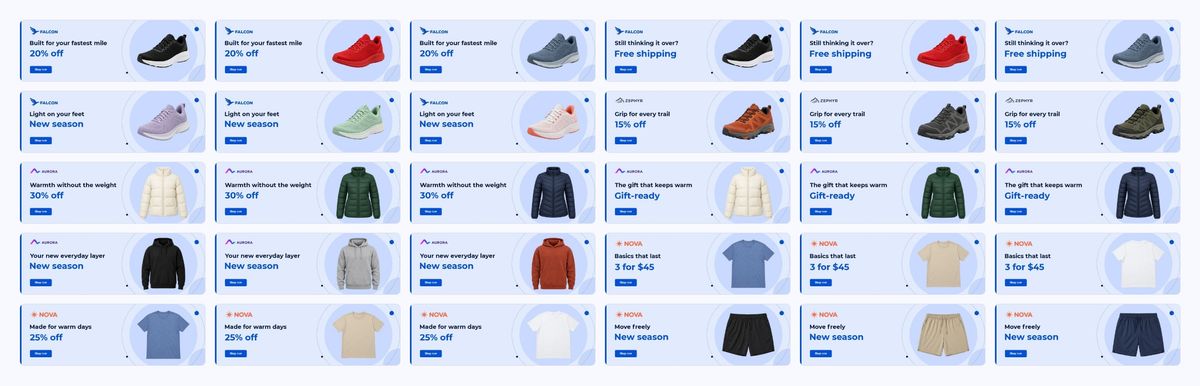
The inputs were that one frame, an offers file with 11 rows, and the product shots were in ImageKit's DAM. We asked Claude Code for the banners:
Build a banner for every offer in offers.csv from this Figma frame, using the products in our ImageKit DAM: https://www.figma.com/design/…?node-id=2-2
Claude read the frame, searched the DAM for the products that match each offer, and reported back:
frame: banner-1200x400 (1200x400)
offers searched: 11 of 11 in the CSV
banners: 30
failed rows: 1
  o11: No product in /products matches brand=zephyr, gender=women, garment_type=trail-shoe
Each of the 30 banners is a live ImageKit URL, and the one offer with no matching product in the DAM was skipped and reported.
ImageKit also does this natively: Creative Automation builds banners in bulk from a template you design inside ImageKit, with no code. This post is for teams whose layouts already live in Figma and who want to keep them there.
Prerequisites:
- Claude Code with the ImageKit DAM MCP connected, and the ImageKit agent skills:
npx skills add imagekit-developer/skills --all - Optionally, the ImageKit DevTools MCP. We used it once to write the URL template that ships with the skill, so you only need it if you want to regenerate that template. The banners are ImageKit URLs either way.
- The Figma remote MCP with a Dev or Full seat on a paid Figma plan. View and Collab seats are limited to 20 MCP tool calls a month, and Figma's rate limits and access page lists the current limits for each plan and seat.
- An ImageKit account with products and custom metadata fields
Source code: the skill, the offers file and both templates are in the demo repo.
The last post built one transformation URL from a prompt. Now we'll build 30 at once.
The URL turns out to be the easy part. The more interesting questions are where the layout comes from, how the right product gets picked for each offer, and what the skill does when there isn't one.
Who owns what
The designer owns the layout in Figma, the DAM owns the assets, and a Claude Code skill joins the two in six steps:
- Read the Figma frame once, using its layer names to see where the product, logo and text go.
- Ask the DAM which metadata fields exist.
- For each offer, search the DAM for matching products and the brand's logo, showing each query first.
- Fill one ImageKit URL template per match, so that the URL itself is the banner.
- Write
banners.csv,failed-rows.csvandcontact-sheet.html. - Fetch every banner and look at the result.
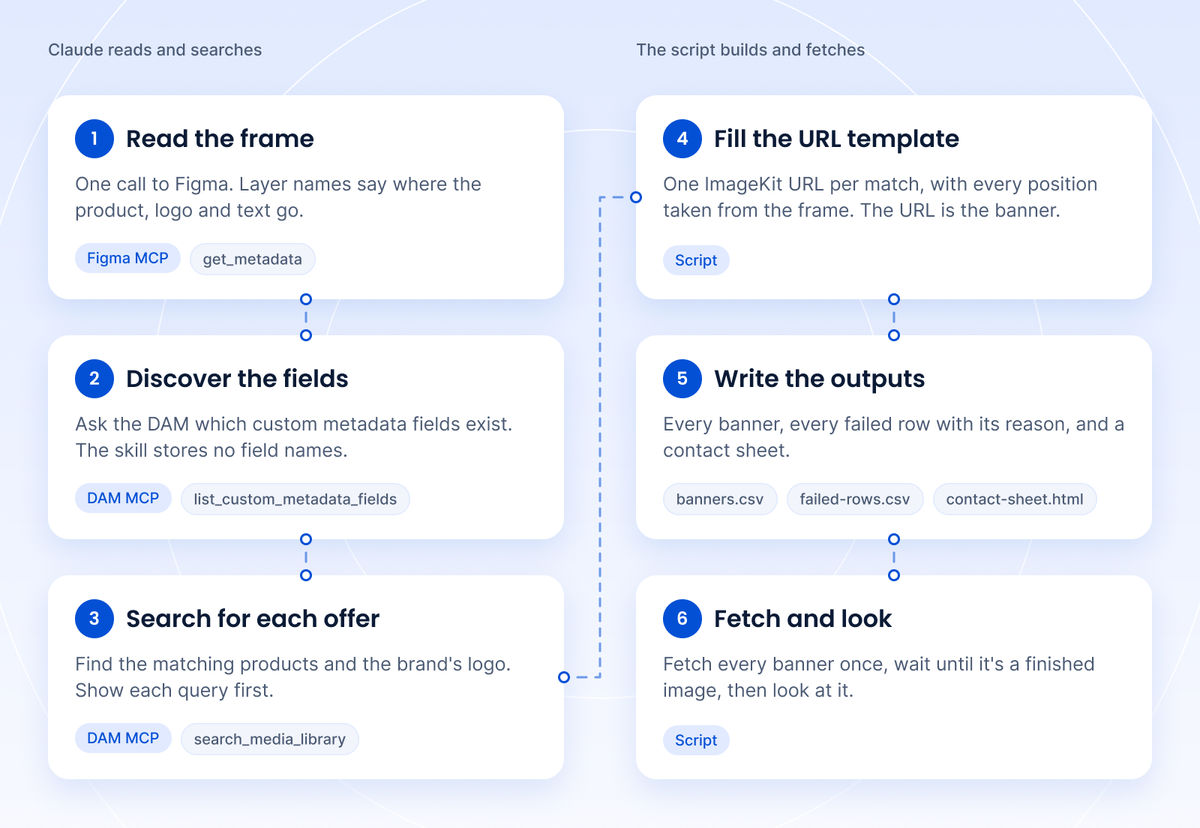
Nothing is exported from Figma per banner. Figma is read once, for layer names and positions, and the frame's static background was exported and uploaded to the DAM once. Every banner is then an ImageKit URL that draws the product, logo and text over that background.
A banner is therefore never a file but a URL, and changing an offer only means changing that URL.
The skill itself is a page of instructions plus two small scripts. Claude does the reading and searching, one script fills the template and writes the three files so that 30 encoded URLs are never assembled by hand, and the other script fetches every banner.
Set up the frame and the connections
Two MCP servers do the work during a run in Claude Code, and a third was used once to prepare the skill:
- Figma's remote MCP server, to read the frame.
- ImageKit DAM MCP, to list metadata fields and search assets.
- ImageKit DevTools MCP, which built the URL template before the first run.
Get started in minutes covers connecting the ImageKit servers.
The skill takes four inputs:
| Input | What it is |
|---|---|
| Figma frame | A link to the frame, including its node-id. Required |
| Offers CSV | One row per offer. Default: offers.csv |
| Offer limit | "First N offers", for a dry run. Default: all rows |
| Output folder | Where the three output files go. Default: banner-output/ |
The offers file is a plain CSV:
offer_id,campaign,brand,gender,garment_type,headline,price,cta
o01,homepage-hero,falcon,men,running-shoe,Built for your fastest mile,20% off,Shop now
o02,retargeting,falcon,men,running-shoe,Still thinking it over?,Free shipping,Shop now
o03,new-arrivals,falcon,women,running-shoe,Light on your feet,New season,Shop now
o04,trail-launch,zephyr,men,trail-shoe,Grip for every trail,15% off,Shop now
o05,winter-sale,aurora,women,jacket,Warmth without the weight,30% off,Shop now
o06,gift-guide,aurora,women,jacket,The gift that keeps warm,Gift-ready,Shop now
o07,new-arrivals,aurora,men,hoodie,Your new everyday layer,New season,Shop now
o08,bundle,nova,unisex,t-shirt,Basics that last,3 for $45,Shop now
o09,summer-sale,nova,unisex,t-shirt,Made for warm days,25% off,Shop now
o10,new-arrivals,nova,men,shorts,Move freely,New season,Shop now
o11,trail-launch,zephyr,women,trail-shoe,Grip for every trail,15% off,Shop now
It holds eleven offers across four brands. Three combinations appear twice with different copy, so their products show up in two sets of banners. The examples in the rest of this post follow the first offer, Falcon men's running shoes, and the jackets, hoodies, t-shirts and shorts in the other offers are built in exactly the same way.
Name the layers
The frame is the contract between the designer and the skill, and it has six layers with these exact names:
| Layer | What it is |
|---|---|
background | Everything static: color, shapes, decoration. The only part that gets exported. |
product | An empty rectangle marking the product slot |
logo | An empty rectangle marking the logo slot |
headline | A text placeholder |
price | A text placeholder, for offer text like "20% off" |
cta | A button with a text label, for "Shop now" |
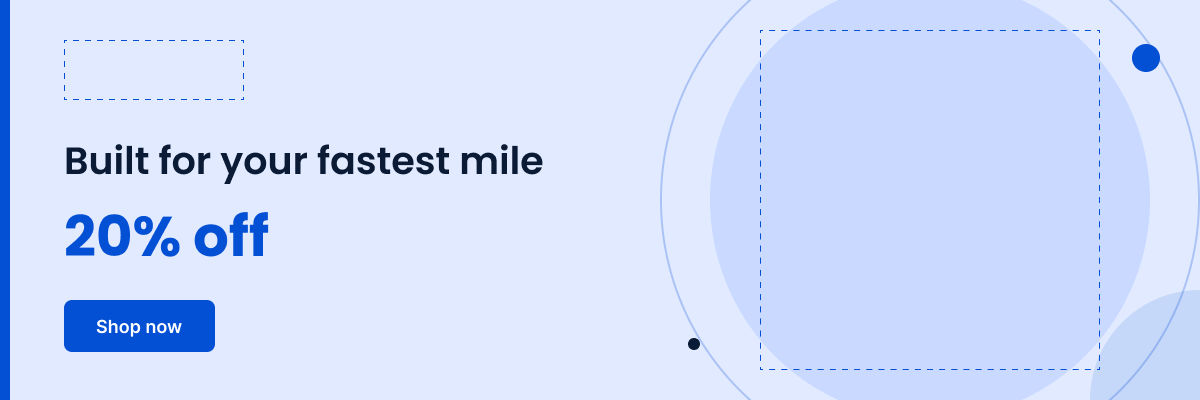
The dashed boxes mark where things go, not what goes there.
The background layer is exported once and uploaded to the DAM, at /templates/banner-1200x400-bg.png. Export it in isolation, so that the sample text and the slot outlines are not drawn into it.
How the skill reads the frame
One get_metadata call on the frame returns this:
<frame id="2:2" name="banner-1200x400" x="100" y="100" width="1200" height="400">
  <frame id="2:3" name="background" x="0" y="0" width="1200" height="400">
    <ellipse id="2:4" name="product-disc" x="710" y="-20" width="440" height="440" />
    <ellipse id="2:5" name="ring" x="660" y="-70" width="540" height="540" />
    <ellipse id="2:6" name="corner-arc" x="1090" y="290" width="220" height="220" />
    <rounded-rectangle id="2:7" name="accent-bar" x="0" y="0" width="10" height="400" />
    <ellipse id="2:8" name="dot-azure" x="1132" y="44" width="28" height="28" />
    <ellipse id="2:9" name="dot-space" x="688" y="338" width="12" height="12" />
  </frame>
  <rounded-rectangle id="2:10" name="product" x="760" y="30" width="340" height="340" />
  <rounded-rectangle id="2:11" name="logo" x="64" y="40" width="180" height="60" />
  <text id="2:12" name="headline" x="64" y="132" width="480" height="57" />
  <text id="2:13" name="price" x="64" y="194" width="206" height="84" />
  <frame id="2:14" name="cta" x="64" y="300" width="151" height="52">
    <text id="2:15" name="cta-label" x="32" y="15" width="87" height="22" />
  </frame>
</frame>
That is the whole layout: the product goes in a 340x340 box at 760, 30, the logo goes in a 180x60 box at 64, 40, and each of the three text layers has a position of its own.
The one limit is that get_metadata returns positions and sizes and nothing else, with no font, font size or color, so the skill derives font sizes from layer heights. In this frame the headline and price layers are 1.5 times as tall as their font size, which makes the 57px headline a 38px font. The button label uses its own ratio, 1.22, so its 22px layer is an 18px font. Fonts and colors are fixed in the template.
How it finds assets
The skill stores no field names and instead asks the DAM what exists, with list_custom_metadata_fields.
Our account has eight custom metadata fields. The offers file has three targeting columns, brand, gender and garment_type, and each one matched a field by name, while the other five fields were ignored. If a targeting column has no matching field, the skill is told to stop and say which one.
Then it searches, once per offer, and shows each query before running it. Here's the first:
path:        /products
searchQuery: type = "file" AND "customMetadata.brand" = "falcon" AND "customMetadata.gender" = "men" AND "customMetadata.garment_type" = "running-shoe"
sort:        ASC_NAME
limit:       3
It came back with three files:
/products/falcon-running-shoe-men-black-and-white.png
/products/falcon-running-shoe-men-signal-red.png
/products/falcon-running-shoe-men-slate-blue.png
The logo search has one clause and a different folder: /logos, where brand is falcon. Products and logos are told apart by where they live, not by a field.
None of this is left to Claude's judgment on the day, because it is written into the skill. These are the rules from the skill's instructions that govern the search, copied as they appear there:
- **Never loosen a search.** If a query returns nothing, the offer
  fails. Do not retry it with a clause removed, a different operator, a
  different path or a similar value. Gender and garment type are never
  dropped.
- **Show every query before running it.**
- **A missing product or a missing logo fails the whole row**, with the
  reason in `failed-rows.csv`. Never substitute another asset.
- **Products come from `/products` and logos from `/logos`.** They are
  told apart by path, not by any field.
The full run made 11 product searches and 4 logo searches. With the background lookup and the field listing, that's 17 calls to the DAM.
How each banner URL is built
We generated the URL template once, with DevTools transformation_builder, and the skill fills it in for every match.
Here's the URL of the first banner, followed by the image it produced in our account. your_imagekit_id stands in for the account's ImageKit ID, and the URL only loads in an account that holds the same background, product and logo files:
https://ik.imagekit.io/your_imagekit_id/templates/banner-1200x400-bg.png?tr=l-image,i-products@@falcon-running-shoe-men-black-and-white.png,e-bgremove:w-340,h-340,c-at_max,lxc-930,lyc-200,l-end:l-image,i-logos@@falcon-logo.png,lx-64,ly-40,e-bgremove:w-180,h-60,c-at_max,l-end:l-text,i-Built%20for%20your%20fastest%20mile,lx-64,ly-132,fs-38,ff-Montserrat,tg-b,co-0B1B36,l-end:l-text,ie-MjAlIG9mZg%3D%3D,lx-64,ly-194,fs-56,ff-Montserrat,tg-b,co-0450D5,l-end:l-text,i-Shop%20now,lx-64,ly-300,fs-18,ff-Roboto,pa-15_32,tg-b,bg-0450D5,r-8,co-FFFFFF,l-end:f-webp,q-90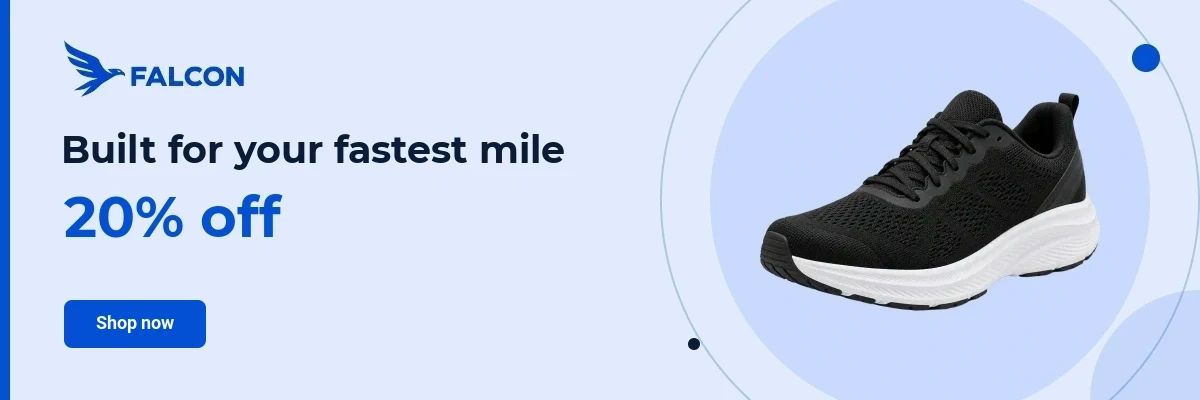
Below are the five overlay layers on one base image:
| Part of the URL | What it does |
|---|---|
templates/banner-1200x400-bg.png | The base image: the frame's exported background |
l-image,i-products@@…,e-bgremove:w-340,h-340,c-at_max,lxc-930,lyc-200,l-end | The product: background removed, fitted inside 340x340 without cropping, centered on the product slot |
l-image,i-logos@@…,lx-64,ly-40,e-bgremove:w-180,h-60,c-at_max,l-end | The logo, the same way, at the logo slot |
l-text,i-Built%20for…,lx-64,ly-132,fs-38,…,l-end | The headline |
l-text,ie-MjAlIG9mZg%3D%3D,lx-64,ly-194,fs-56,…,l-end | The price |
l-text,i-Shop%20now,…,pa-15_32,tg-b,bg-0450D5,r-8,co-FFFFFF,l-end | The button: one text layer with a background, padding and rounded corners |
f-webp,q-90 | The output format, which the next section explains |
Two details to note:
- The price is encoded.
20% offcontains a%, so it goes in asie-MjAlIG9mZg%3D%3D, which is the text in base64 and then percent-encoded, and3 for $45got the same treatment. Plain text like the headline goes in afteri-. - Overlays are trimmed by default. ImageKit crops each overlay to its subject before placing it, so the cut-out product fills its slot.
Set an output format
Our first complete banner is the top one here, and the bottom one is the same URL with an output format added:
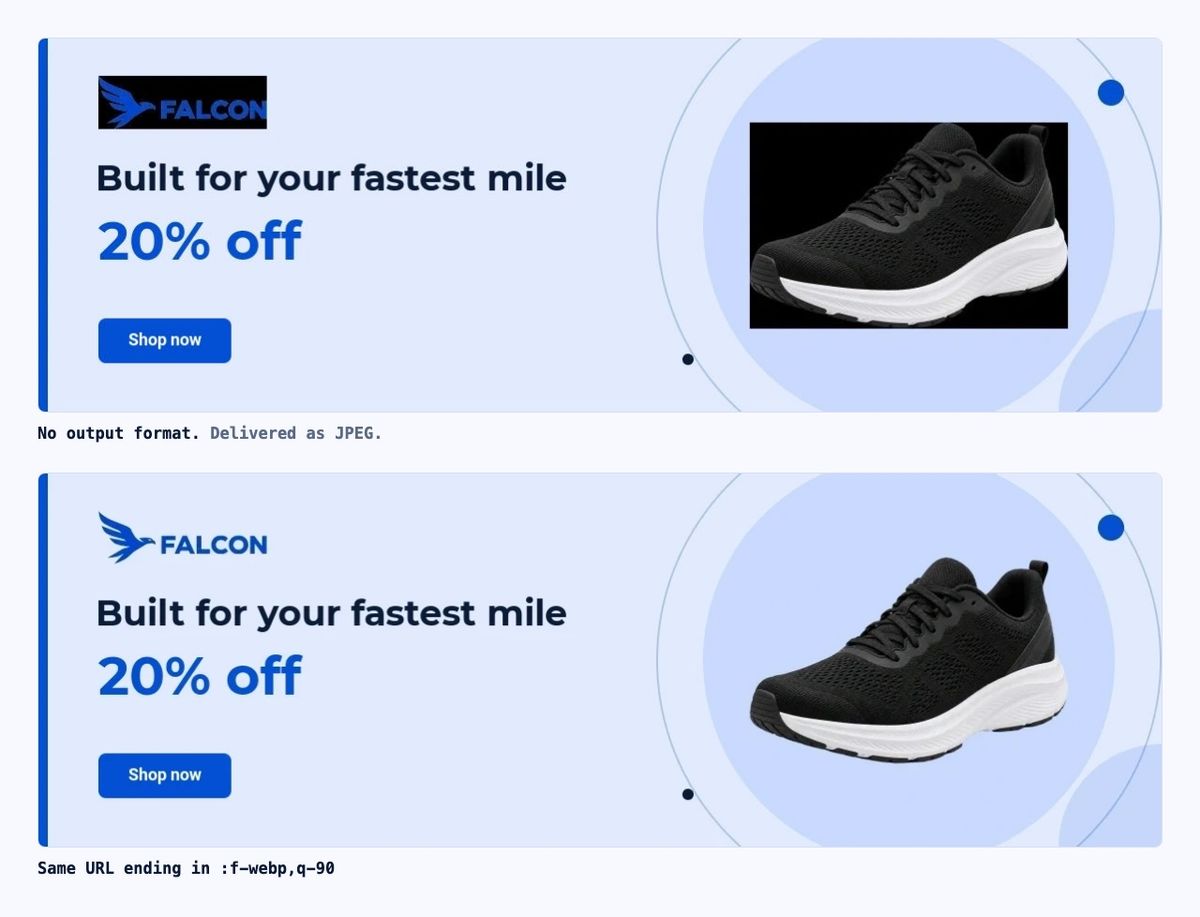
The background removal had worked, but with no format in the URL, ImageKit delivered the banner as a JPEG, and the removed areas behind the product and the logo came out solid black. Ending the URL with a format that supports transparency fixes it. PNG and WebP both work, and for the same banner the PNG was about 129 KB against about 20 KB for the WebP, which is why the template ends in f-webp,q-90.
Fonts
The frame is set in Poppins and Inter, and neither is in ImageKit's built-in font list, so the banners use Montserrat and Roboto, the closest built-ins. The docs describe using any font by uploading the font file to your media library, which we haven't done here.
Fetch every banner once
Background removal takes a moment the first time a product is processed. Most banners with a product ImageKit hadn't processed yet took 11 to 16 seconds on their first request, while the same URL fetched again took about 0.1 second.
The skill's last step therefore fetches every banner once, waits until each is a finished image, and saves it. In our run all 30 came back as finished images from that first fetch, which simply waited out the render, so none of them needed a second request.
A 200 response only says that the transformation is valid, not that the picture is right, which is why the step ends with looking at each banner.
When an offer has no match
Offer o11 is for Zephyr women's trail shoes, and there are none in the DAM. The skill ran the same search it runs for every offer, got nothing back, and wrote the offer to failed-rows.csv with its reason instead of trying again with a looser query. That matters because the DAM does have Zephyr trail shoes for men: without the gender clause the search would succeed, and a women's offer would go out with a men's product on it. A missing banner is a row in a file that someone can act on, while a wrong banner is already live.

Same skill, new frame
The Figma file has a second frame, banner-1080x1080, with the same six layer names in a square layout. We pointed the skill at it without editing any file in the skill, and it produced 30 square banners, with the same offer skipped and reported.
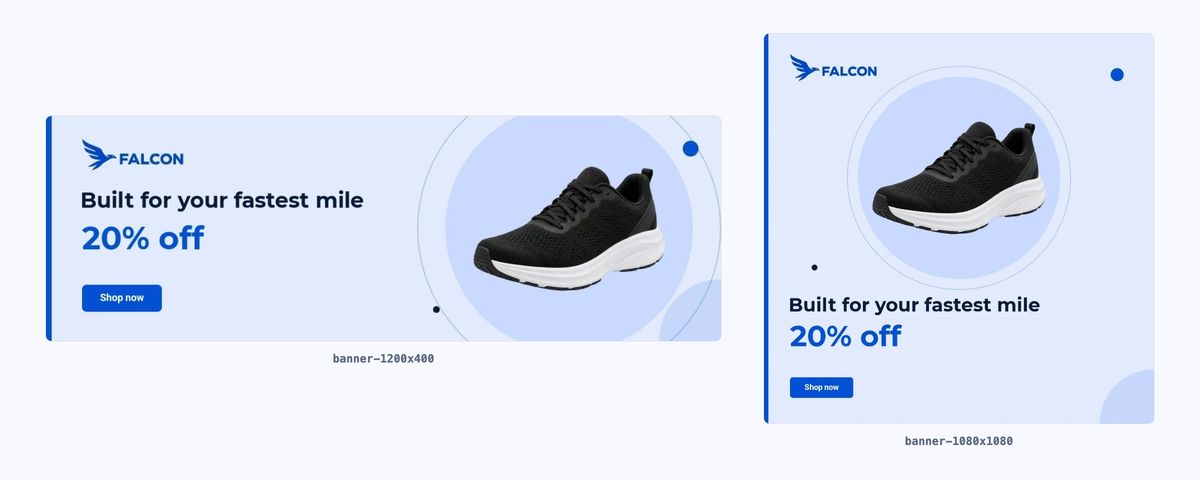
Here's what changed in the URL for the first banner:
banner-1200x400 | banner-1080x1080 | |
|---|---|---|
| Base image | banner-1200x400-bg.png | banner-1080x1080-bg.png |
| Product | w-340,h-340, lxc-930,lyc-200 | w-480,h-480, lxc-540,lyc-400 |
| Logo | lx-64,ly-40, w-180,h-60 | lx-72,ly-56, w-240,h-80 |
| Headline | lx-64,ly-132,fs-38 | lx-72,ly-728,fs-52 |
| Price | lx-64,ly-194,fs-56 | lx-72,ly-806,fs-80 |
| Button | lx-64,ly-300,fs-18, pa-15_32 | lx-72,ly-952,fs-22, pa-18_40 |
Every one of those numbers came from the second frame's get_metadata result, so when the designer moved the layers, the skill followed without any change.
There is also an alternative workflow in which the banners stay in Figma. Instead of building each banner as a URL, Claude copies the template frame once per banner, fills in the headline and price as live text, and places a background-removed cut-out of the product and the logo, fetched from ImageKit, into their slots. We tried this on all 30 banners, outside the skill, and it took four Figma tool calls and 60 image uploads, two per banner.
What you get is a Figma file full of editable frames. That gives your team the chance to make manual edits before anything is exported, such as moving the image, changing the crop or adjusting an effect, and the output is pixel-exact with the brand fonts included. It trades some of the automation for manual control, since each banner still has to be exported and uploaded to become a URL, while all of the frames are still created in one go.
If your team doesn't design in Figma, you may not need any of this, because Creative Automation lets you build a reusable template in ImageKit and generate variations in bulk, with no code. The workflow in this post is for teams whose layouts already live in Figma and whose designers want to keep working there.
What we built
- Named six layers in one Figma frame and uploaded its background once
- Ran a Claude Code skill that read the frame, discovered the DAM's metadata fields, and searched for each offer
- Got 30 banners as live ImageKit URLs, plus a contact sheet
- Saw the one offer with no match skipped and reported, not filled with the wrong product
- Reran the same skill on a square frame without changing it
With the banners live, the next post finds out whether anyone is looking at them, with a usage report from the Admin MCP server that arrives without anyone asking.
Get started
The skill, the offers file and both frames' templates are in the demo repo, so you can run this against your own DAM. The Build with AI guide covers connecting the ImageKit MCP servers in every client. To try it on your own assets, sign up for a free ImageKit account.