If you're building any kind of long-form video experience on a Next.js site, two features are no longer optional: subtitles and chapters. Subtitles are an accessibility requirement and the difference between a viewer watching with sound off and leaving. Chapters are how viewers navigate a 12-minute lecture without scrubbing blindly through the timeline.
Producing them manually is expensive. Transcription services, VTT files to upload, chapter breakpoints to define and time, then the same work repeated for every translated language you support. For a course platform with hundreds of lessons or a podcast archive that grows weekly, that workflow doesn't scale.
ImageKit's Video Player SDK ships AI-generated subtitles, AI-generated chapters, translations into other languages, and word-level highlighting. No transcription queue, no manual VTT files and no separate vendor.
In this tutorial we'll build a single lesson page for a fictional course platform. By the end, the video player will auto-generate English subtitles from the audio, auto-generate chapter markers, translate the subtitles into Spanish and French, and highlight each word as it's spoken.
What we'll cover:
- Install and configure the ImageKit Video Player SDK
- Render a basic lesson player
- Enable AI auto-generated subtitles with word highlighting
- Add multi-language translations
- Enable AI auto-generated chapters
- Add manual chapters when you need precise control
You'll need a Next.js 15+ project and an ImageKit account. The full source code is available on GitHub.
Setting up the ImageKit Video Player SDK
Install the package in a Next.js 15+ / React 18+ project:
npm install @imagekit/video-playerAdd your ImageKit ID to .env.local:
NEXT_PUBLIC_IMAGEKIT_ID=ikmediaThe samples below use ikmedia, ImageKit's public sample account, so the player runs with zero setup. Generating new AI subtitles and chapters, though, runs on videos in your account with the Video API enabled — so swap in your ImageKit ID to caption your own videos. You'll find it in the dashboard under the Developer options menu item; it's the path segment after ik.imagekit.io/.
The Player SDK uses browser APIs, so any component that renders it needs "use client" in the App Router. Here's a minimal lesson player to confirm the install works:
"use client";

import { IKVideoPlayer } from "@imagekit/video-player/react";
import "@imagekit/video-player/styles.css";

const ikOptions = {
  imagekitId: process.env.NEXT_PUBLIC_IMAGEKIT_ID!,
};

const source = {
  src: "https://ik.imagekit.io/ikmedia/docs/video-player/subtitle_chapter/demo.mp4",
};

export default function LessonPlayer() {
  return <IKVideoPlayer ikOptions={ikOptions} source={source} />;
}
Drop this component into a page and you should see a working player with default controls. If the video doesn't load, double-check that the source URL is publicly accessible from your ImageKit account.
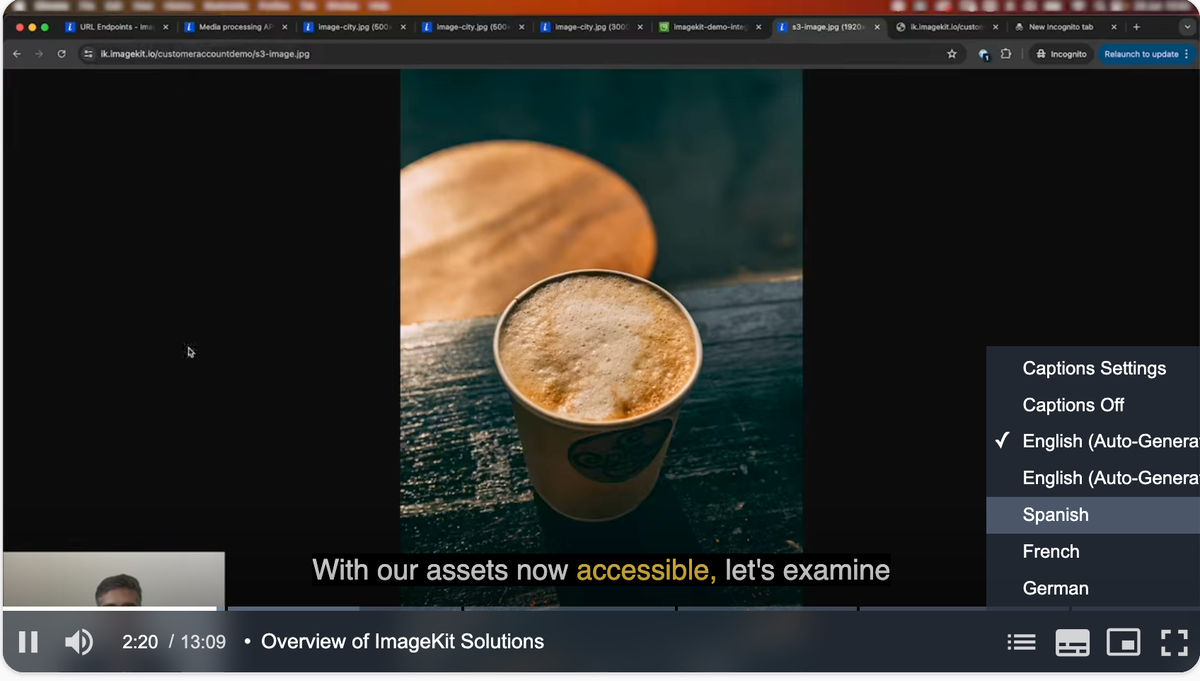
Enabling AI auto-generated subtitles
Subtitles are a property on the source object, configured through the textTracks array. Each entry describes one subtitle track. Set autoGenerate: true and ImageKit runs speech-to-text on the audio and produces a VTT track automatically.
const source = {
  src: "https://ik.imagekit.io/ikmedia/docs/video-player/subtitle_chapter/demo.mp4",
  textTracks: [
    {
      autoGenerate: true,
      default: true,
      maxChars: 60,
    },
  ],
};
That's the full subtitle setup. Press play and the captions render at the bottom of the player. The viewer can toggle them on or off using the captions button in the player controls.

Here's what each option does:
| Option | Purpose |
|---|---|
autoGenerate | Trigger speech-to-text on the source video. Default: false. |
default | Whether the track is enabled by default. Set true for the primary language so captions appear without the viewer needing to enable them. Default: false. |
maxChars | Maximum characters per subtitle line before the SDK breaks to a new line. 60 reads cleanly on desktop and mobile. Default: 60. |
The first time the video is requested with autoGenerate: true, ImageKit's Video API transcribes it in the background. The track becomes available within seconds for short clips and within a minute for longer videos. Subsequent requests are served from cache instantly.
AI transcription costs 2 extension units per minute of source video. When you enable both auto-generated subtitles and auto-generated chapters, you're billed once — not separately for each. Each translated language adds another 2 units per minute. Check pricing before enabling at scale.
Adding karaoke-style word highlighting
Standard subtitles render a full line at a time. Word highlighting goes further. Each word in the current subtitle line gets visually emphasized as it's spoken, which is particularly useful for educational content where active reading along helps comprehension and accessibility.
Enable it with one additional option:
textTracks: [
  {
    autoGenerate: true,
    default: true,
    maxChars: 60,
    highlightWords: true,
  },
],
That's it. The SDK uses word-level timing data from the speech recognition output to track playback against each word in the current line. If the SDK can't get word-level timestamps for the source language, it falls back gracefully to standard line-at-a-time rendering.
Note that highlightWords and maxChars apply to the original auto-generated transcription only. Translated tracks render without word-level highlighting.
Adding multi-language translations
If your audience is global, add a translations array to the same auto-generated track and the SDK produces translated caption tracks alongside the source-language track. Translations live on the same textTracks entry as your subtitle config — no separate track needed. As noted above, maxChars and highlightWords apply to the original transcription only, so the translated tracks render as standard line-at-a-time captions.
textTracks: [
  {
    autoGenerate: true,
    default: true,
    maxChars: 60,
    highlightWords: true,
    translations: [
      { langCode: "es", label: "Spanish" },
      { langCode: "fr", label: "French" },
      { langCode: "de", label: "German" },
    ],
  },
],
Each translation appears as its own selectable subtitle track in the player's captions menu. The SDK uses the source-language transcription as the input to translation, so you only pay for transcription once and get the translated tracks as derivatives.

| Option | Purpose |
|---|---|
langCode | Language code for the target language. es for Spanish, fr for French, de for German, ja for Japanese, etc. See the supported languages list for the full set. |
label | The display name shown in the captions menu. Use whatever makes sense for your UI. |
default | Whether to activate this translated track by default. Default: false. |
For a course platform, translations are often the difference between a lesson reaching a regional audience or not. The cost of generating five translated tracks for a 10-minute lesson is a few cents. The cost of producing them manually is days of contractor time per language.
Enabling AI auto-generated chapters
Chapters work the same way as subtitles. Set chapters: true on the source object and ImageKit analyzes the video and produces chapter markers that appear on the progress bar.
const source = {
  src: "https://ik.imagekit.io/ikmedia/docs/video-player/subtitle_chapter/demo.mp4",
  chapters: true,
  textTracks: [
    /* ...subtitle config from above */
  ],
};
The viewer hovers any chapter marker on the progress bar to see the chapter title, and clicks to jump to that section. The chapter list also appears in the player's chapter menu so viewers can scan the full lesson structure before deciding where to watch.
ImageKit's chapter detection works by analyzing the audio for natural topic breaks and visual changes in the video for scene boundaries. For a typical course lesson with clear topic transitions, this produces accurate chapter divisions without manual work.
Chapters are generated in the video's original language. If you've added translations to your textTracks, ImageKit also generates chapter titles in those languages, so the chapter menu matches whichever caption track the viewer has selected.
Adding manual chapters when you need control
Auto chapters are great for speed. They're not always right for content where you need exact section boundaries. A lesson with strict syllabus alignment, a podcast where chapters need to match show notes, a conference talk where each demo needs its own marker. For these cases, the SDK accepts a chapters object with explicit timestamps.
const source = {
  src: "https://ik.imagekit.io/ikmedia/docs/video-player/subtitle_chapter/demo.mp4",
  chapters: {
    0: "Introduction",
    90: "What are Server Components?",
    240: "Building your first component",
    480: "Common pitfalls",
    600: "Wrapping up",
  },
};
The format is an object where each key is a timestamp in seconds and the value is the chapter title. The SDK infers each chapter's end time from the next chapter's start time, and the final chapter runs to the end of the video.
| Field | Purpose |
|---|---|
| Key (number) | Seconds into the video where the chapter begins. |
| Value (string) | Display label for the chapter, shown on hover and in the chapter menu. |
When you pass an object, the SDK uses your chapters and skips automatic generation entirely. When you pass true, the SDK runs auto-detection. Pick one approach per video.
If you'd rather manage chapters as a file, chapters also accepts { url: "https://ik.imagekit.io/your_imagekit_id/chapters.vtt" } pointing at a standard WebVTT chapters file. That's handy when the same chapter list is reused across environments or edited outside the codebase.
A practical pattern: use chapters: true for your back catalog where manual work isn't worth it, and pass an explicit object for high-value content where the chapter structure is part of the lesson design.
The ImageKit Video Player SDK is currently in beta. Test thoroughly before using it in production, and pin to a specific version rather than latest.
Putting it together on a lesson page
The full lesson page is small. A header with the course context, the player, and a footer with navigation to the next lesson.
// app/page.tsx
import Link from "next/link";
import LessonPlayer from "@/components/LessonPlayer";

export default function LessonPage() {
  return (
    <main className="max-w-4xl mx-auto px-6 py-10">
      <nav className="text-sm text-zinc-500 mb-4">
        <Link
          href="/courses/react-server-components"
          className="hover:text-zinc-900"
        >
          React Server Components
        </Link>
        <span className="mx-2">/</span>
        <span>Lesson 1</span>
      </nav>

      <header className="mb-8">
        <h1 className="text-3xl font-semibold">
          Introduction to React Server Components
        </h1>
        <p className="text-zinc-600 mt-2">12 minutes · Free preview</p>
      </header>

      <LessonPlayer />

      <footer className="mt-10 pt-6 border-t border-zinc-200 flex justify-between text-sm">
        <span className="text-zinc-400">Previous</span>
        <Link
          href="/courses/react-server-components/data-fetching"
          className="text-zinc-900 font-medium hover:underline"
        >
          Next: Data fetching →
        </Link>
      </footer>
    </main>
  );
}
Notice the page itself stays a Server Component — only LessonPlayer opts into "use client". Keeping the client boundary as small as possible is the recommended App Router pattern: the server renders the static page shell, and just the interactive player ships JavaScript to the browser.
That's the whole tutorial. A working lesson page with AI subtitles, AI chapters, three translation tracks, and word highlighting in three files.
What we built
The lesson page now does what would otherwise take a transcription service, a translation pipeline, a chapter editor, and custom player code to wire them together. AI handles transcription and translation. The Player SDK handles rendering. You configured all of it in one source object.
For the broader picture of what the Video Player SDK supports beyond subtitles and chapters, the overview docs cover playlists, shoppable products, smart reframing, and floating playback, all configurable from the same source object you just used. The full reference for the auto-subtitle options used above lives in the auto subtitles guide.
If you're building richer video experiences on the same player, see How to add video playlists to your Next.js site with ImageKit for queuing related videos with auto-advance, or How to add shoppable videos to your Next.js site with ImageKit for product overlays and clickable hotspots.
Sign up for a free ImageKit account and try AI subtitles on a video you already have hosted somewhere.


