Most Python image optimization tutorials teach you to open a file with Pillow, resize it, set quality to 85, and save a new copy. That works for batch jobs. For web delivery, it means you're maintaining a processing pipeline, storing multiple variants, and serving them from your own infrastructure.
ImageKit handles this at the CDN layer. Connect your existing storage or upload the original once, then resize, compress, and convert formats through URL parameters. No local processing, no variant storage, no encoding pipeline.
A key advantage over alternatives is that ImageKit works directly with your existing storage. If your images already live in Amazon S3, Google Cloud Storage, Azure Blob Storage, or a web server, you don't have to move them anywhere. ImageKit fetches, transforms, and serves them through its CDN in real time.
This guide shows how to integrate ImageKit into a Python application for image optimization, from connecting your media to delivering AI-enhanced variants.
What we'll cover:
- Connecting your media: external storage or direct upload via the Python SDK.
- Generating optimized URLs with resize, quality, and modern format delivery.
- Responsive images by generating
srcsetstrings in Python. - Smart cropping with face detection and object-aware focus.
- AI transformations: background removal and generative fill.
- Production patterns: signed URLs, post-upload optimization, and Flask/FastAPI integration.
All examples use the imagekitio Python SDK v5.4.0. The complete working code is in the python-image-optimization repository.
Install and configure the SDK
pip install imagekitioInitialize the client with your private key:
import os
from imagekitio import ImageKit

client = ImageKit(
    private_key=os.environ.get("IMAGEKIT_PRIVATE_KEY"),
)

URL_ENDPOINT = os.environ.get("IMAGEKIT_URL_ENDPOINT")
# e.g., "https://ik.imagekit.io/your_imagekit_id"
The SDK reads IMAGEKIT_PRIVATE_KEY from the environment by default. Use a .env file with python-dotenv to keep credentials out of source control.
You can find your private key and URL endpoint in the ImageKit dashboard under Developer Options.
Connect your media
There are two ways to bring your images into ImageKit. Pick the one that fits your existing setup.
Option 1: Connect external storage
If your images already live in Amazon S3, Google Cloud Storage, Azure Blob Storage, DigitalOcean Spaces, Wasabi, or a public web server, you can connect that storage as an origin in your ImageKit dashboard. Your files stay where they are. ImageKit fetches them on demand, applies transformations, and serves them through its CDN.
To connect external storage:
- Go to External storage in your ImageKit dashboard.
- Click Add new and choose your storage type.
- Provide the bucket name, region, and read-only access credentials.
- Attach the new origin to a URL endpoint.
Once connected, any file in your bucket is accessible at:
https://ik.imagekit.io/your_imagekit_id/path/to/image.jpgYou can apply transformations to these files using the same helper.build_url() method shown later in this guide. The src argument is the path inside your bucket.
For step-by-step instructions per provider, see the external storage docs.
Option 2: Upload via the Python SDK
If you want ImageKit to host your media (or you don't have an existing storage system), upload files directly with the SDK:
with open("product-photo.jpg", "rb") as f:
    file_data = f.read()

response = client.files.upload(
    file=file_data,
    file_name="product-photo.jpg",
    folder="/products",
)

print(response.url)
# https://ik.imagekit.io/your_id/products/product-photo.jpg
print(response.file_id)
For a more modern approach, you can use pathlib.Path (Python 3.9+):
from pathlib import Path

response = client.files.upload(
    file=Path("product-photo.jpg"),
    file_name="product-photo.jpg",
    folder="/products",
)
The response is a Pydantic model with typed fields: url, file_id, file_path, size, file_type, and more. Use response.to_dict() to serialize it.
You can also upload from a URL by downloading the content first:
import urllib.request

with urllib.request.urlopen("https://example.com/image.jpg") as resp:
    content = resp.read()

response = client.files.upload(
    file=content,
    file_name="remote-image.jpg",
)For async applications, use AsyncImageKit with await. The API is identical. See the async usage docs for the full pattern.
The rest of this guide works the same whether your files are in external storage or in ImageKit's Media Library. The only difference is the path you pass to src.
Generate optimized URLs
This is where ImageKit replaces local Pillow processing. Instead of opening the file, resizing it, and saving a new copy, you generate a URL with transformation parameters. ImageKit processes it on the CDN.
Resizing images
url = client.helper.build_url(
    url_endpoint=URL_ENDPOINT,
    src="/products/product-photo.jpg",
    transformation=[{
        "width": 800,
        "height": 600,
        "crop": "at_max",
    }],
)
print(url)
# .../products/product-photo.jpg?tr=w-800,h-600,c-at_max
When you specify both width and height, the default crop strategy is maintain_ratio, which crops from all sides to preserve the aspect ratio. The at_max strategy used above keeps the full image visible by adjusting one dimension instead. Other strategies include pad_resize (adds padding) and force (squeezes to exact dimensions). See the resize and crop docs for the full list.
Modern format delivery
ImageKit reads the browser's Accept header on every request and delivers the most efficient format that browser supports:
- Chrome, Firefox, Edge: AVIF first, then WebP
- Safari: WebP, then JPEG/PNG
In practice, you should omit the format parameter entirely and let ImageKit handle this automatically. You don't need to maintain WebP, AVIF, and JPEG variants of every image.
# Let ImageKit pick the best format
url = client.helper.build_url(
    url_endpoint=URL_ENDPOINT,
    src="/products/product-photo.jpg",
    transformation=[{"width": 800, "quality": 80}],
)
To verify automatic format conversion is working, request the URL from a browser, open DevTools, and check the Content-Type response header. In Chrome, you'll see image/avif even though the URL itself ends in .jpg. In Safari, you'll see image/webp.
AVIF compresses around 20% smaller than WebP at equivalent visual quality. Across a product page with ten images, that adds up to meaningful bandwidth savings with zero code change.
AVIF is enabled per account. Check your ImageKit dashboard under Settings > Images > Optimization > Automatic format conversion to confirm AVIF optimization is available on your account.
Quality control
ImageKit's default image quality is 80 on a 1-100 scale (configurable globally in your dashboard settings). This balances visual quality and compression well for most content. Override it per-URL when you need finer control:
# Product detail pages: higher quality
transformation = [{"width": 1200, "quality": 90}]

# Listing thumbnails: smaller, faster
transformation = [{"width": 300, "quality": 70}]
The Pillow comparison
Here's what the same resize-and-compress workflow looks like with local processing:
# With Pillow (local processing)
from PIL import Image

img = Image.open("product-photo.jpg")
img = img.resize((800, 600), Image.Resampling.LANCZOS)
img.save("product-photo-800.webp", "webp", quality=80)
# Now you need to store, serve, and cache this variant
# With ImageKit (URL-based)
url = client.helper.build_url(
url_endpoint=URL_ENDPOINT,
src="/products/product-photo.jpg",
transformation=[{"width": 800, "quality": 80}],
)
# Done. No file to store. CDN handles caching.With Pillow, you also need to maintain variants for different sizes, handle format conversion per browser, and set up CDN caching. ImageKit does all of this through the URL.
Proper image resizing using responsive images
Serving a single image width to all devices wastes bandwidth on mobile and looks soft on retina displays. Modern HTML solves this with the srcset attribute, which lists multiple image variants and lets the browser pick the right one for the current viewport.
In Python, you build the srcset string by generating one URL per width:
def build_srcset(src: str, widths: list[int], quality: int = 80) -> str:
    """Generate a srcset attribute string for responsive images."""
    parts = []
    for w in widths:
        url = client.helper.build_url(
            url_endpoint=URL_ENDPOINT,
            src=src,
            transformation=[{"width": w, "quality": quality}],
        )
        parts.append(f"{url} {w}w")
    return ", ".join(parts)


srcset = build_srcset(
    src="/products/hero.jpg",
    widths=[400, 800, 1200, 1600],
)
Use the helper inside any template engine. Here's a Jinja2 example:
<img
  src="{{ build_srcset('/products/hero.jpg', [800])|first_url }}"
  srcset="{{ build_srcset('/products/hero.jpg', [400, 800, 1200, 1600]) }}"
  sizes="(max-width: 768px) 100vw, (max-width: 1200px) 50vw, 33vw"
  alt="Product hero"
  loading="lazy"
/>
The browser uses the sizes attribute to figure out the rendered width at the current viewport, then picks the closest URL from srcset. ImageKit serves each variant resized, compressed, and in the right format for that browser.
Always set sizes for images that don't span the full screen. Without it, the browser assumes the image fills 100vw and may request a file far larger than what you actually render.
Advanced image optimizations and transformations
When building an image-heavy Python application, basic optimizations like resizing and format conversion are just the starting point. In many cases, you'll need more advanced transformations to truly elevate the visual experience for your users.
That's where ImageKit stands out. Beyond being more cost-efficient, it offers 50+ real-time transformations that go far beyond standard optimization.
Smart crop for images
Standard cropping cuts from the edges inward. A landscape photo cropped to a square gives you the center third. If faces or the main subject sit off-center, they get cut.
ImageKit's focus parameter detects the subject and centers the crop around it.
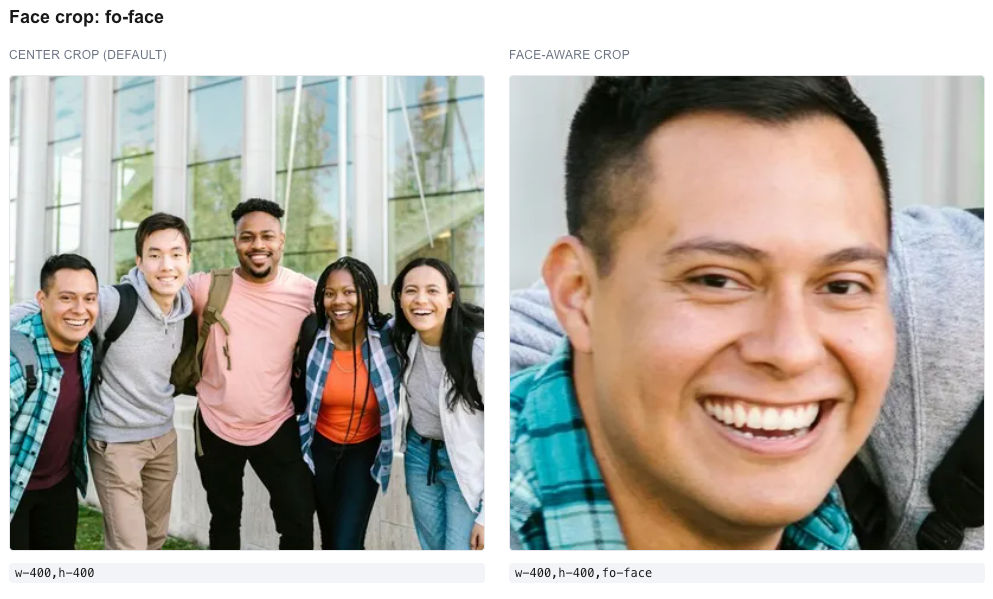
Face crop
Using fo-face, ImageKit detects faces in the frame and produces a crop centered on them, regardless of where they appear in the original.
url = client.helper.build_url(
    url_endpoint=URL_ENDPOINT,
    src="/team/group-photo.jpg",
    transformation=[{
        "width": 400,
        "height": 400,
        "focus": "face",
    }],
)
This produces a 400x400 crop centered on the detected face. Useful for user avatars, profile pictures, and team pages where the face needs to stay in frame.
General smart crop
For product images or any content with or without faces, fo-auto detects the main subject:
url = client.helper.build_url(
    url_endpoint=URL_ENDPOINT,
    src="/lifestyle/living-room.jpg",
    transformation=[{
        "width": 600,
        "height": 600,
        "focus": "auto",
    }],
)
Useful for catalog pages where images arrive in different aspect ratios and need to be normalized to a grid while keeping the subject centered.
ImageKit also supports object-aware cropping for 80+ object categories: person, car, dog, cat, shoe, bag, bottle, food, plant, laptop, and more. Specify the object name in focus:
# Crop around the dog in this image
transformation = [{"width": 600, "height": 600, "focus": "dog"}]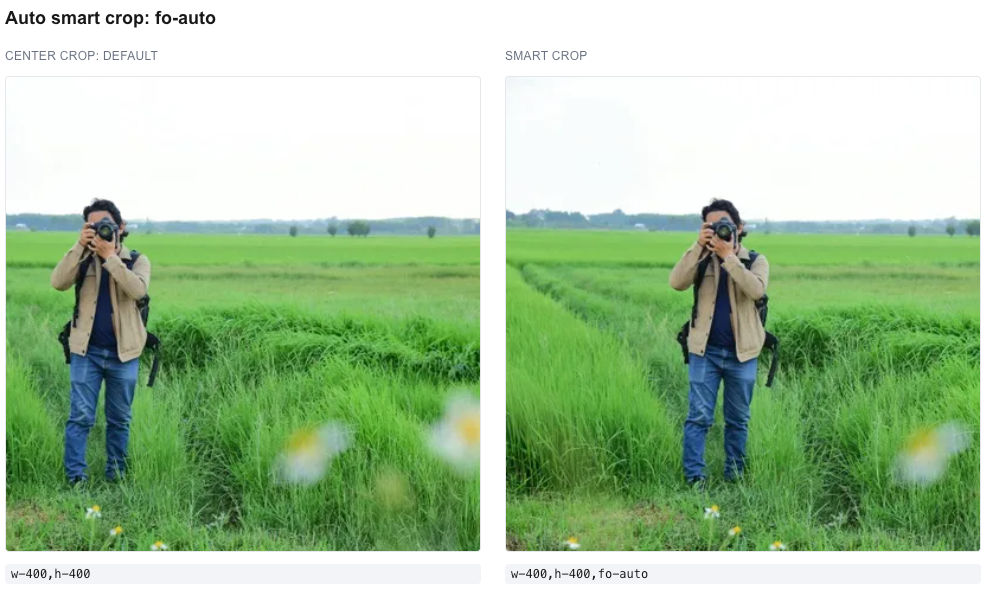
AI transformations
ImageKit provides AI-powered transformations as URL parameters. Two that are particularly useful for product imagery are background removal and extending an image with generative fill.
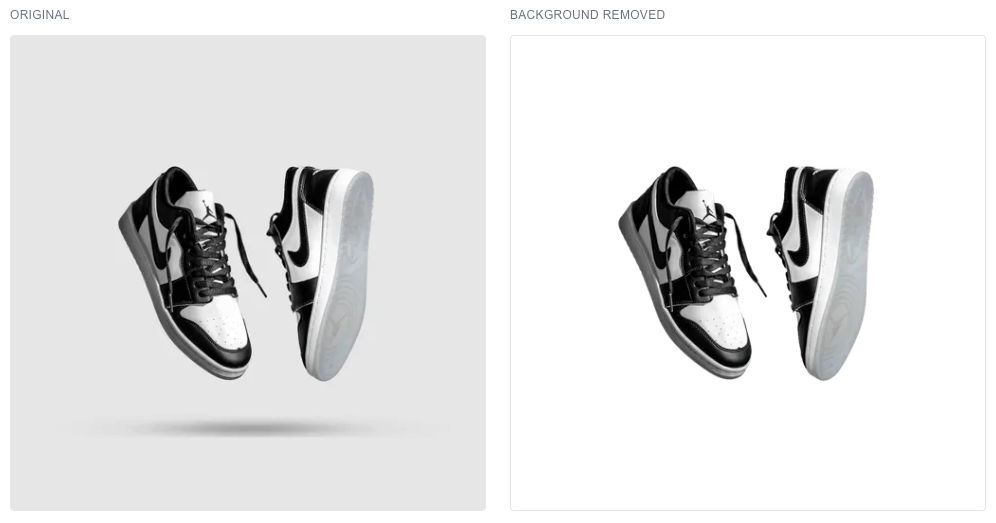
Background removal
url = client.helper.build_url(
    url_endpoint=URL_ENDPOINT,
    src="/products/headphones.jpg",
    transformation=[{"raw": "e-bgremove"}],
)
e-bgremove strips the background and outputs a transparent PNG. The cost-efficient option handles most use cases. For higher fidelity using a third-party service, use e-removedotbg.
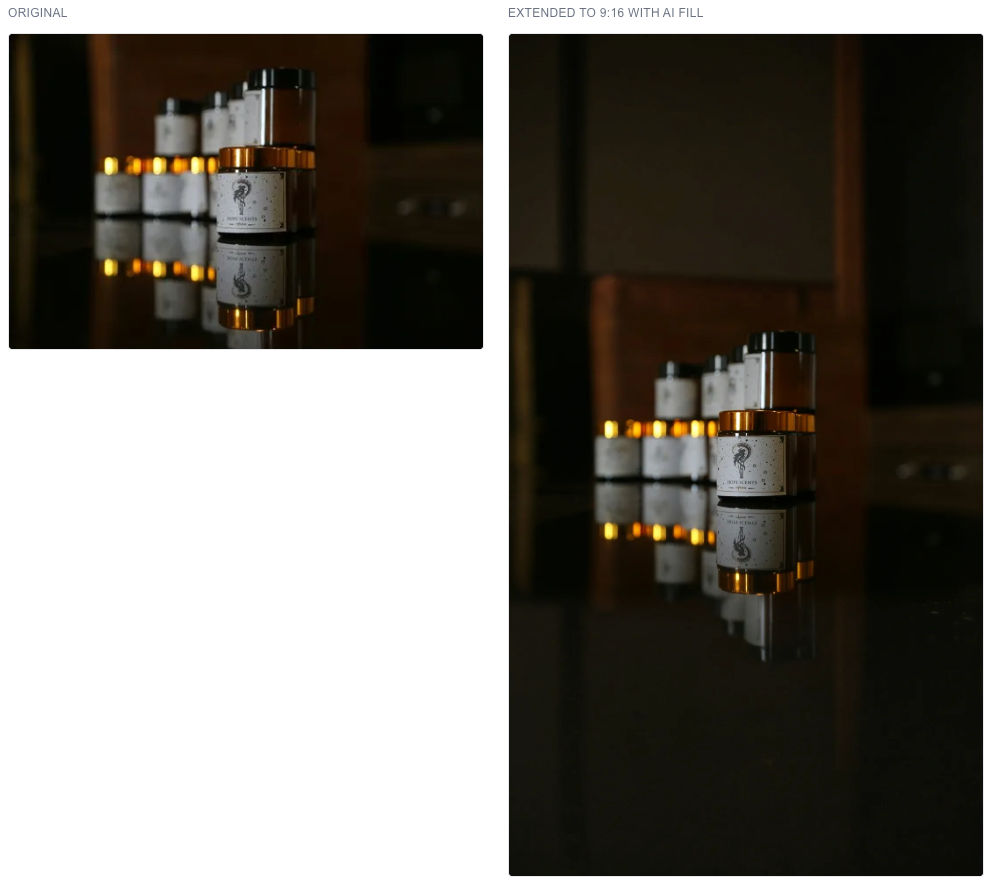
Generative fill
When you need an image to fit a different aspect ratio, traditional resizing either crops content or adds solid padding. Generative fill expands the image boundaries with AI-generated content that blends with the original.
This is especially useful for responsive layouts. A square product image designed for desktop might need to become 9:16 for a mobile hero section. Instead of cropping the product or leaving blank space, generative fill extends the background naturally.
url = client.helper.build_url(
    url_endpoint=URL_ENDPOINT,
    src="/products/headphones.jpg",
    transformation=[{
        "width": 1080,
        "height": 1920,
        "raw": "cm-pad_resize,bg-genfill",
    }],
)
The original image is placed inside the 1080x1920 frame. cm-pad_resize preserves the full original content and determines where padding is needed. bg-genfill fills that padding with AI-generated content that matches the scene.
You can optionally guide the generation with a text prompt:
transformation = [{
    "width": 1080,
    "height": 1920,
    "raw": "cm-pad_resize,bg-genfill-prompt-clean white studio background",
}]
Chaining AI transformations
You can stack AI transformations by passing multiple objects to transformation. Each object becomes a separate step, separated by a colon in the URL:
url = client.helper.build_url(
    url_endpoint=URL_ENDPOINT,
    src="/products/headphones.jpg",
    transformation=[
        {"raw": "e-bgremove"},
        {"raw": "e-dropshadow,w-500"},
    ],
)
# Generates: ?tr=e-bgremove:e-dropshadow,w-500
The colon separates async operations (background removal runs first, then the shadow is applied to the result). Sync operations like resize are comma-separated within the same step.
AI transforms are in beta and take longer to process than basic transforms (seconds to a minute depending on complexity). Generate them once before going live rather than on first request to warm the cache. See the AI transformation docs for the full list.
Signed URLs for access control
For private or premium content, generate time-limited signed URLs:
url = client.helper.build_url(
    url_endpoint=URL_ENDPOINT,
    src="/premium/exclusive-photo.jpg",
    transformation=[{"width": 800}],
    signed=True,
    expires_in=3600,  # 1 hour
)
The signed URL includes an HMAC signature and expiration timestamp. After the expiration, the URL returns a 401. No server-side access checks needed.
Enable Restrict Unsigned URLs in your dashboard settings to require signatures on all requests.
Post-upload optimization
You can generate optimized variants at upload time instead of waiting for the first request:
response = client.files.upload(
    file=file_data,
    file_name="hero-banner.jpg",
    transformation={
        "post": [
            {
                "type": "thumbnail",
                "value": "w-400,h-300",
            },
            {
                "type": "thumbnail",
                "value": "w-800,h-600",
            },
        ]
    },
)
ImageKit generates the specified variants in the background after upload. This is useful for e-commerce catalogs where you know the exact sizes you need for listing pages, detail pages, and cart thumbnails.
Listen for completion via webhooks if you need to update your database when variants are ready.
Integration with Flask and FastAPI
Here's a minimal Flask example that uploads an image and returns optimized URLs for different use cases:
from flask import Flask, request, jsonify
from imagekitio import ImageKit
import os

app = Flask(__name__)

client = ImageKit(
    private_key=os.environ.get("IMAGEKIT_PRIVATE_KEY"),
)
URL_ENDPOINT = os.environ.get("IMAGEKIT_URL_ENDPOINT")

@app.route("/upload", methods=["POST"])
def upload():
    file = request.files["image"]
    file_data = file.read()

    response = client.files.upload(
        file=file_data,
        file_name=file.filename,
        folder="/uploads",
    )

    path = response.file_path

    return jsonify({
        "original": response.url,
        "thumbnail": client.helper.build_url(
            url_endpoint=URL_ENDPOINT,
            src=path,
            transformation=[{"width": 300, "height": 300, "focus": "auto"}],
        ),
        "detail": client.helper.build_url(
            url_endpoint=URL_ENDPOINT,
            src=path,
            transformation=[{"width": 1200, "quality": 85}],
        ),
        "social": client.helper.build_url(
            url_endpoint=URL_ENDPOINT,
            src=path,
            transformation=[{"width": 1200, "height": 630, "focus": "auto"}],
        ),
    })
One upload produces three optimized variants through URL generation. No local file processing, no storage management. The same pattern works with FastAPI, Django, or any Python framework.
Conclusion
Pillow is the right tool for local batch processing: watermarking a folder of images, generating thumbnails for a CLI tool, or preprocessing uploads before storage. For web delivery, you're doing unnecessary work.
ImageKit moves optimization to the CDN. Connect your existing storage or upload originals once, generate URLs with the transforms you need, and let ImageKit handle resizing, compression, format negotiation, smart cropping, AI enhancements, and caching. The Python SDK gives you typed methods for uploads, URL generation, and file management without touching Pillow.
Sign up for a free ImageKit account and try ?tr=w-800,fo-face on one of your images.